
[스프링 시큐리티] 사용자인증은 어디서 어떻게 할까?
스프링 시큐리티
1. 정의
스프링 시큐리티는 스프링 기반의 어플리케이션의 보안(인증과 권한)을 담당하는 프레임워크이다. 만약 스프링시큐리티를 사용하지 않았다면, 자체적으로 세션을 체크하고 redirect 등을 해야할 것이다. 스프링 시큐리티는 보안과 관련해서 체계적으로 많은 옵션들로 이를 지원해준다.Spring Security는 filter 기반으로 동작하기 때문에 Spring MVC와 분리되어 관리 및 동작한다. (Spring MVC는 DispatcherServlet 이라는 서블릿을 기반으로 하기 때문에 인터셉터만을 사용할 수 있다. 하지만 보안과 관련된 부분은 인터셉터 이전 단계인 필터에서 구현하는 것이 일반적이고 효율적이다.) 참고로 security 3.2 부터는 XML로 설정하지 않고도 자바 bean 설정으로 간단하게 설정할 수 있도록 지원한다.
보안 관련 용어 정리
- 접근 주체(Principal): 보호된 대상에 접근하는 유저
- 인증(Authenticate): 요청을 보낸 유저가 누구인지 확인(ex. 로그인), 애플리케이션의 작업을 수행할 수 있는 주체임을 증명
- 인가(Authorization): 현재 유저가 어떤 서비스, 페이지에 접근할 수 있는 권한을 부여
- 권한: 인증된 주체가 애플리케이션의 동작을 수행할 수 있는 권한
- 먼저 인증 과정을 통해 주체가 증명 된 이후 권한을 부여할 수 있음
- 권한 부여에도 두 가지 영역이 존재하는데 웹 요청 권한, 메소드 호출 및 도메인 인스턴스에 대한 접근 권한 부여가 있음
+)인증과 권한을 구분해 생각하는 것이 스프링 시큐리티를 이해하는데 가장 중요!
- 권한: 인증된 주체가 애플리케이션의 동작을 수행할 수 있는 권한
2. Spring Security의 구조
2-1. 인증관련 구조

- n개의 Filter가 존재한다
- Filter 아래 Manager 1 개가 존재한다
- Manager 아래 n’개의 Provider가 존재한다
- Provider를 통해 인증정보와 권한이 담긴 Authentication을 반환한다
- Spring Security는 기본적으로 세션-쿠키방식으로 인증한다.
- 유저가 로그인을 시도(Http Request)
- AuthenticationFilter 에서부터 위와같이 2번(UsernamePasswordAuthenticationFilter에서만 인증이 필요한 경우만 사용)->3번->…->6번 순서로 user DB까지 접근(UserDetailsService에서 db 접근 DAO를 사용)
- DB에 존재하는 유저라면 UserDetails로 꺼내 유저의 session 생셩
- Spring Security의 인메모리 세션저장소인 SecurityContextHolder에 저장
- 유저에게 session ID와 함께 응답을 내려줌
- 이후 요청에서는 요청쿠키에서 JSESSIONID를 보고 검증 후 유효하면 Authentication을 내려 (단 분산환경에서는 여러 방법을 통해 세션정보를 공유하던지 아예 세션을 사용하지 않고 쿠키 등을 이용해 해결해야 한다. 분산 환경에서 Authentication을 어떻게 저장 할지는 차후 정리할 예정이다.)
아래는 로그인 성공 상황인데, 익명세션ID에서 security가 내려주는 유효한 세션ID로 뒤 바뀌는 장면이다.

2-2. security의 filter들
- 필터를 거쳐 서블릿으로 들어가는 구조

- 더 자세한 필터 종류
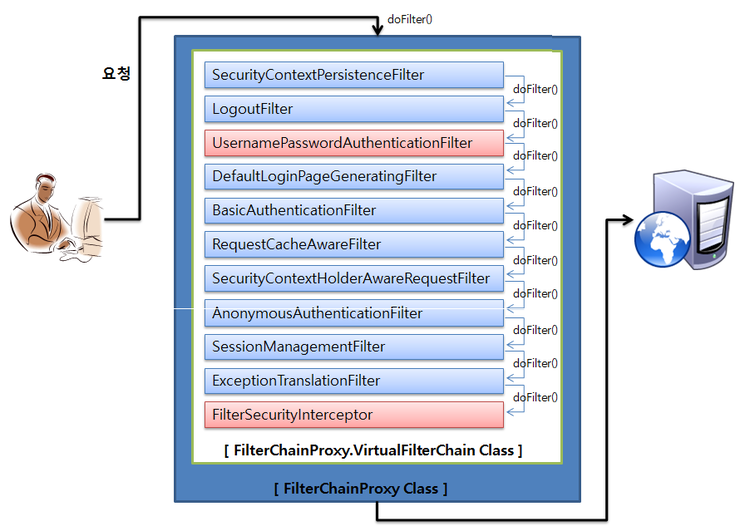
- SecurityContextPersistenceFilter: SecurityContextRepository에서 SecurityContext를 가져오거나 저장하는 역할을 한다. 추가적으로 설명하면, Authentication 객체는 필터 체인 상의 최초에 위치한 SecurityContextPersistenceFilter의 (repo)session에 저장된다. 그리고 다음 접속 시에는 (repo)session에서 정보가 담긴 Authentication 객체를 가져올 수 있게 된다. 만약 NullSecurityContextRepository라면 세션저장소에 저장이 되지 못하고 매번 요청마다 인증을 확인해야 한다.
-
LogoutFilter: 설정된 로그아웃 URL로 오는 요청을 감시하며, 해당 유저를 로그아웃 처리
- (UsernamePassword)AuthenticationFilter : (아이디와 비밀번호를 사용하는 form 기반 인증) 설정된 로그인 URL로 오는 요청을 감시하며, 유저 인증 처리
- AuthenticationManager를 통한 인증 실행
- 인증 성공 시, 얻은 Authentication 객체를 SecurityContext에 저장 후 AuthenticationSuccessHandler 실행
- 인증 실패 시, AuthenticationFailureHandler 실행
- DefaultLoginPageGeneratingFilter : 인증을 위한 로그인폼 URL을 감시한다.
- BasicAuthenticationFilter : HTTP 기본 인증 헤더를 감시하여 처리한다.
- RequestCacheAwareFilter : 로그인 성공 후, 원래 요청 정보를 재구성하기 위해 사용된다.
- SecurityContextHolderAwareRequestFilter : HttpServletRequestWrapper를 상속한 SecurityContextHolderAwareRequestWapper 클래스로 HttpServletRequest 정보를 감싼다. SecurityContextHolderAwareRequestWrapper 클래스는 필터 체인상의 다음 필터들에게 부가정보를 제공한다.
- AnonymousAuthenticationFilter : 이 필터가 호출되는 시점까지 사용자 정보가 인증되지 않았다면 인증토큰에 사용자가 익명 사용자로 나타난다.
- SessionManagementFilter : 이 필터는 인증된 사용자와 관련된 모든 세션을 추적한다.
- ExceptionTranslationFilter : 이 필터는 보호된 요청을 처리하는 중에 발생할 수 있는 예외를 위임하거나 전달하는 역할을 한다.
- FilterSecurityInterceptor : 이 필터는 AccessDecisionManager 로 권한부여 처리를 위임함으로써 접근 제어 결정을 쉽게해준다.
2-3. Authentication
모든 접근 주체(=유저) 는 Authentication 를 생성한다. 이것은 SecurityContext 에 보관되고 사용된다. 즉 security의 세션들은 내부 메모리(SecurityContextHolder)에 쌓고 꺼내쓰는 것이다. 참고로 Authentication 인터페이스는 자주 쓰이니 알아둬야한다.
public interface Authentication extends Principal, Serializable {
  Collection<? extends GrantedAuthority> getAuthorities(); // Authentication 저장소에 의해 인증된 사용자의 권한 목록
  Object getCredentials(); // 주로 비밀번호
  Object getDetails(); // 사용자 상세정보
  Object getPrincipal(); // 주로 ID
  boolean isAuthenticated(); //인증 여부
  void setAuthenticated(boolean isAuthenticated) throws IllegalArgumentException;
}
2-4. AuthenticationManager

유저의 요청 내에 담긴 Authentication를 AuthenticationManager 에 넘겨주고, AuthenticationManager 를 구현한 ProviderManager가 처리한다. 정확히는 ProviderManager 는
private List<AuthenticationProvider> providers;
로 여러 AuthenticationProvider를 가질 수 있는데, 이 친구들이 처리를 해서 Authentication 를 반환해준다. (실패하면 예외던짐)
- AuthenticationManager : 인증요청을 받고 Authentication를 채운다.
- AuthenticationProvider : 실제 인증이 일어나며, 성공하면 Authentication.isAuthenticated = true 를 한다.
3.권한
3-1. 권한 부여 (grant authority)
사용자 인증을 성공적으로 마쳤다면, 이제 이 유저에게 권한을 부여한다. 예를 들어 같은 웹사이트에 로그인을 해도 admin 계정으로 로그인을 하면, 일반 사용자들에게는 보이지 않던 관리 메뉴가 하나 더 생기기도 하는것 처럼 말이다. 이런 경우에 일반사용자는 일반 권한을, admin은 관리자+일반 권한을 가지고 있는 것이다. 보안이 제대로 동작하는 웹사이트를 구축하려면 로그인한 유저에게 적절한 권한을 부여하고, 부여된 권한을 잘 관리해야한다.
3-2. 리소스 가로채기 (intercept)
권한이 있는 유저에게만 리소스를 제공하는 것도, 일단 리소스를 내가 가지고 있어야 가능하다. 보안이란 본래 권한이 없는 자들이 원천적으로 리소스에 접근할 수 없도록 막아내는 것이다. 그런 의미에서 적절한 권한을 가진자만 해당 자원에 접근할 수 있도록 자원의 외부요청을 원천적으로 가로채는 것(Intercept)은 authorization의 중요한 원칙이다.
스프링 시큐리티에서 인터셉터 역할을 하는 필터는 FilterSecurityInterceptor이다. 스프링 시큐리티 필터 체인의 제일 마지막에 위치하고 있는 FilterSecurityInterceptor 에서 특정 요청을 받아들일지 거부할지를 결정한다. FilterSecurityInterceptor 까지 진행되었다는 것은 이미 인증이 완료되고 시스템에서 유효한 사용자라는 것을 이미 알고 있다는 것이다.
FilterSecurityInterceptor 에서는 Authentication의 특정 메소드(Collection
4. 직접 디버깅해보며 정리..
- DelegatingFilterProxy: 스프링 시큐리티가 모든 애플리케이션 요청을 감싸게 해서 모든 요청에 보안이 적용되게 하는 서블릿필터이다.스프링 프레임워크 기반의 웹 애플리케이션에서 서블릿 필터 라이프 사이클과 연계해 스프링 빈 의존성을 서블릿 필터에 바인딩하는데 사용한다.
- FilterChainProxy: 방화벽 관련? (추후 필요시 더 정리)
- VirtualFilterChain: FilterChainProxy 내부 클래스 , 다른 필터들을 호출할 때 계속 자신의 레퍼런스를 보내 다시 자신의 dofilter를 호출하게 한다.
- SecurityContextPersistenceFilter: 정의된 시큐리티 필터 중 가장 먼저 호출되는 필터이다. request에서 세션키를 가져와 세션저장소에 저장된 Authentication을 가져온다. 이후 다른 필터가 다 호출된 이후 Authentication이 있다면 이를 세션에 저장한다.
// SecurityContextPersistenceFilter

public void doFilter(ServletRequest req, ServletResponse res, FilterChain chain)
            throws IOException, ServletException {
        HttpServletRequest request = (HttpServletRequest) req;
        HttpServletResponse response = (HttpServletResponse) res;

        if (request.getAttribute(FILTER_APPLIED) != null) {
            // ensure that filter is only applied once per request
            chain.doFilter(request, response);
            return;
        }

        final boolean debug = logger.isDebugEnabled();

        request.setAttribute(FILTER_APPLIED, Boolean.TRUE);

        if (forceEagerSessionCreation) {
            HttpSession session = request.getSession();

            if (debug && session.isNew()) {
                logger.debug("Eagerly created session: " + session.getId());
            }
        }

        HttpRequestResponseHolder holder = new HttpRequestResponseHolder(request, response);
        SecurityContext contextBeforeChainExecution = repo.loadContext(holder);

        try {
            SecurityContextHolder.setContext(contextBeforeChainExecution);

            chain.doFilter(holder.getRequest(), holder.getResponse());

        } finally {
            SecurityContext contextAfterChainExecution = SecurityContextHolder.getContext();
            // Crucial removal of SecurityContextHolder contents - do this before anything else.
            SecurityContextHolder.clearContext();
            repo.saveContext(contextAfterChainExecution, holder.getRequest(), holder.getResponse());
            request.removeAttribute(FILTER_APPLIED);

            if (debug) {
                logger.debug("SecurityContextHolder now cleared, as request processing completed");
            }
        }
    }
- WebAsyncManagerIntegrationFilter: (추후 필요시 더 정리)
- AbstractPreAuthenticatedProcessingFilter를 상속한 필터:
- dofilter()내 requiresAuthentication() 에서는 SecurityContextPersistenceFilter에 저장한 Authentication을 꺼내 인증이 필요한지를 판단한다. 이후 인증이 필요없는 경우 인증 로직을 타지 않고 다음 필터를 호출한다.(아래 1번 소스코드 참조)
- 인증이 필요한 경우 doAuthenticate를 호출한다. Request에서 principal과 credentials를 찾고 PreAuthenticatedAuthenticationToken을 만든다. 이후 토큰을 ProviderManager.authenticate로 넘겨준다.
- 토큰을 Provider로 넘기고 관련 service를 호출해 인증하고 권한을 발급한다. (user의 detail정보도 채워준다.)
- 필터의 인증 중 문제가 발생하지 않은 경우 successfulAuthentication()이 호출되고 Holder에 Authentication을 저장한다. (아래 2번 소스코드 참조)
- 이벤트 퍼블리셔를 통해 성공했는지 실패했는지 등을 알림. 해당 이벤트를 처리하는 핸들러가 처리하기 위해. 쿠키를 통한 인증을 할 경우 이벤트 헨들러를 통해 쿠키를 구워 줄 수 있다.
- 만약 쿠키를 이용한 인증을 한다면 여기서 쿠키 핸들러를 통해 Principal을 확인하는 것을 추천.
~~~java
//1번 소스코드
/**
-
Try to authenticate a pre-authenticated user with Spring Security if the user has not yet been authenticated. */ public void doFilter(ServletRequest request, ServletResponse response, FilterChain chain) throws IOException, ServletException {
if (logger.isDebugEnabled()) { logger.debug(“Checking secure context token: “ + SecurityContextHolder.getContext().getAuthentication()); }
if (requiresAuthentication((HttpServletRequest) request)) { doAuthenticate((HttpServletRequest) request, (HttpServletResponse) response); }
chain.doFilter(request, response); } ~~~
-
    //2번 소스코드
    /**
     * Puts the <code>Authentication</code> instance returned by the
     * authentication manager into the secure context.
     */
    protected void successfulAuthentication(HttpServletRequest request, HttpServletResponse response, Authentication authResult) {
        if (logger.isDebugEnabled()) {
            logger.debug("Authentication success: " + authResult);
        }
        SecurityContextHolder.getContext().setAuthentication(authResult);
        // Fire event
        if (this.eventPublisher != null) {
            eventPublisher.publishEvent(new InteractiveAuthenticationSuccessEvent(authResult, this.getClass()));
        }
    }
- SecurityContextHolderAwareRequestFilter: (발 번역) ServletRequest를 서블릿 API 보안 메소드를 구현하는 request 랩퍼로 채우는 필터이다.
- 서블릿 3환경에서 사용된 랩퍼클래스는 SecurityContextHolderAwareRequestWrapper 이다.
- 서블릿 3 환경에서 SecurityContextHolderAwareRequestWrapper는 다음과 같은 추가 메소드를 제공하도록 확장됐다.
- HttpServletRequest.authenticate(HttpServletResponse) - Allows the user to determine if they are authenticated and if not send the user to the login page. 참조 setAuthenticationEntryPoint(AuthenticationEntryPoint).
- HttpServletRequest.login(String, String) - Allows the user to authenticate using the AuthenticationManager. 참조 setAuthenticationManager(AuthenticationManager).
- HttpServletRequest.logout() - Allows the user to logout using the LogoutHandlers configured in Spring Security. 참조 setLogoutHandlers(List).
- AsyncContext.start(Runnable) - Automatically copy the SecurityContext from the SecurityContextHolder found on the Thread that invoked AsyncContext.start(Runnable) to the Thread that processes the Runnable.
- AnonymousAuthenticationFilter: 이 필터가 호출되는 시점까지 사용자 정보가 인증되지 않았다면 인증토큰에 사용자가 익명 사용자로 나타난다.
    public void doFilter(ServletRequest req, ServletResponse res, FilterChain chain)
            throws IOException, ServletException {

        if (applyAnonymousForThisRequest((HttpServletRequest) req)) {
            if (SecurityContextHolder.getContext().getAuthentication() == null) {
                SecurityContextHolder.getContext().setAuthentication(createAuthentication((HttpServletRequest) req));

                if (logger.isDebugEnabled()) {
                    logger.debug("Populated SecurityContextHolder with anonymous token: '"
                        + SecurityContextHolder.getContext().getAuthentication() + "'");
                }
            } else {
                if (logger.isDebugEnabled()) {
                    logger.debug("SecurityContextHolder not populated with anonymous token, as it already contained: '"
                        + SecurityContextHolder.getContext().getAuthentication() + "'");
                }
            }
        }

        chain.doFilter(req, res);
    }
- ExceptionTranslationFilter: 이 필터는 보호된 요청을 처리하는 동안 발생할 수 있는 기대한 예외의 기본 라우팅과 위임을 처리함. try문에서 바로 다음 필터를 호출함. 예외 처리를 위해 IOException, Exception을 잡는 catch문을 만듬.
    public void doFilter(ServletRequest req, ServletResponse res, FilterChain chain)
            throws IOException, ServletException {
        HttpServletRequest request = (HttpServletRequest) req;
        HttpServletResponse response = (HttpServletResponse) res;

        try {
            chain.doFilter(request, response);

            logger.debug("Chain processed normally");
        }
        catch (IOException ex) {
            throw ex;
        }
        catch (Exception ex) {
            // Try to extract a SpringSecurityException from the stacktrace
            Throwable[] causeChain = throwableAnalyzer.determineCauseChain(ex);
            RuntimeException ase = (AuthenticationException)
                    throwableAnalyzer.getFirstThrowableOfType(AuthenticationException.class, causeChain);

            if (ase == null) {
                ase = (AccessDeniedException)throwableAnalyzer.getFirstThrowableOfType(AccessDeniedException.class, causeChain);
            }

            if (ase != null) {
                handleSpringSecurityException(request, response, chain, ase);
            } else {
                // Rethrow ServletExceptions and RuntimeExceptions as-is
                if (ex instanceof ServletException) {
                    throw (ServletException) ex;
                }
                else if (ex instanceof RuntimeException) {
                    throw (RuntimeException) ex;
                }

                // Wrap other Exceptions. This shouldn't actually happen
                // as we've already covered all the possibilities for doFilter
                throw new RuntimeException(ex);
            }
        }
    }
- FilterSecurityInterceptor: 이 필터는 권한부여와 관련한 결정을 AccessDecisionManager에게 위임해 권한부여 결정 및 접근 제어 결정을 쉽게 만들어 준다. FilterSecurityInterceptor 까지 진행되었다는 것은 이미 인증이 완료되고 시스템에서 유효한 사용자라고 판단했다는 것 이다. FilterSecurityInterceptor 에서는 Authentication의 특정 메소드(Collection
getAuthorities()) 를 통해서 얻은 권한 목록을 통해서 요청을 승인 할지, 거부할 지를 판단한다. 아래 그림은 클래스 관계와 작업 순서를 결합한 그림이다. 가장 기본이 되는 접근 결정 관리자(AffirmativeBased - 1개만 승인해도 통과)와 보터(RoleVoter – 권한이 ‘ROLE_’ 로 시작하는 권한을 판단) 를 예로 들어본다.
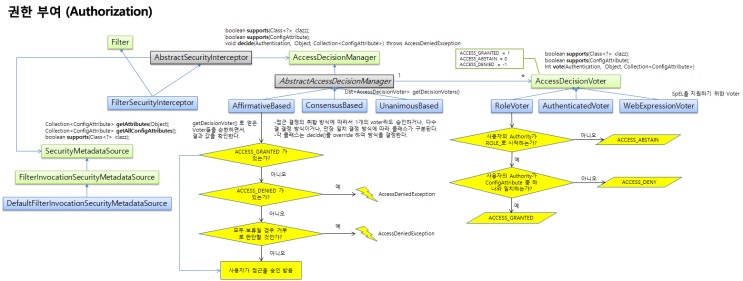
크게보기
위 그림에서 설명한 접근을 결정하는 AccessDecisionManager의 구현 클래스를 조금 자세히 설명하면 아래와 같다. 물론 사용자가 직접 구현하여 DI하는 것도 가능하다. 스프링 시큐리티에서는 3개의 기본 구현 클래스를 제공한다.
- AffirmativeBased: 보터가 접근을 승인하면 이전에 거부된 내용과 상관없이 접근이 승인
- ConsensusBased: 다수 표가 결정에 영향
- UnanimousBased: 모든 보터가 만장일치로 접근을 승인해야 함
각 클래스의 정책 구현은 decide() 메소드를 각각 override 해서 기능을 지원한다. AccessDecisionManager는 여러 개의 보터들을 가지고 있다. 보터(voter)는 관리자가 설정한 리소스에 대한 접근 권한과 사용자가 가진 authority (Authentication의 getAuthorities() 로 획득)들을 비교하여 접근 가능 여부 (ACCESS_GRANTED, ACCESS_DENIED, ACCESS_ABSTAIN)를 결정하는 객체이다.
AccessDecisionVoter 인터페이스에 정의된 접근 가능 여부에 대한 상수들을 조금 자세히 설명하면 아래와 같다.
- ACCESS_GRANTED (승인): 리소스에 대한 접근 권한을 줄 것을 권장
- ACCESS_DENIED (거부): 리소스에 대한 접근 권한을 거부할 것을 권장
- ACCESS_ABSTAIN (보류): 의사 결정을 내리지 않음
FilterSecurityInterceptor의 doFilter() 내용을 간단히 정리하면 아래와 같다.
- 사용자가 접근 권한을 설정한 ConfigAttribute(url에 대한 접근 권한) 들을 가져와서 AccessDecisionManager 에 설정된 voter 들에서 지원하는지 여부를 확인한다. 만약 지원하지 않으면 예외를 발생시킨다.
- SecurityContextHolder.getContext().getAuthentication() 를 통해 Authentication 객체를 가져와서 AccessDecisionManager의 decide() 를 호출한다.
- AccessDecisionManager 를 구현한 클래스에서는 자신들이 가지고 있는 voter 들을 순환하면서 vote() 를 호출하여 ACCESS_XXX 하는 결과 값을 받아 판단한다. 권한이 없는 경우에는 AccessDeniedException 을 발생 시킨다.
Q1. SecurityContextHolder를 static으로 사용하는데 어떻게 필터에서 필요한 SecurityContext를 찾을 수 있을까?
A1. 내부적으로 전략패턴을 통해 만들어진 SecurityContextHolderStrategy가 3개 있고 그 중 디폴트인 ThreadLocalSecurityContextHolderStrategy을 보면 답을 얻을 수 있다. 또한 그 안을 보면 ThreadLocal을 쓰고 있는데 이 클래스를 사용하면 쓰레드를 기준으로 저장된 변수를 가져올 수 있다. ThreadLocal
/**
 * A <code>ThreadLocal</code>-based implementation of {@link SecurityContextHolderStrategy}.
 *
 * @author Ben Alex
 *
 * @see java.lang.ThreadLocal
 * @see org.springframework.security.core.context.web.SecurityContextPersistenceFilter
 */
final class ThreadLocalSecurityContextHolderStrategy implements SecurityContextHolderStrategy {
    //~ Static fields/initializers =====================================================================================

    private static final ThreadLocal<SecurityContext> contextHolder = new ThreadLocal<SecurityContext>();

    //~ Methods ========================================================================================================

    public void clearContext() {
        contextHolder.remove();
    }

    public SecurityContext getContext() {
        SecurityContext ctx = contextHolder.get();

        if (ctx == null) {
            ctx = createEmptyContext();
            contextHolder.set(ctx);
        }

        return ctx;
    }

    public void setContext(SecurityContext context) {
        Assert.notNull(context, "Only non-null SecurityContext instances are permitted");
        contextHolder.set(context);
    }

    public SecurityContext createEmptyContext() {
        return new SecurityContextImpl();
    }
}
Q2. 그렇다면 JVM내에서 모두 같은 SecurityContext를 공유하고 싶은 경우는 어떻게 하는가?
A2. 이미 정의 있는 GlobalSecurityContextHolderStrategy를 사용하거나 커스텀 전략을 만들고 그 전략의 이름인 strategyName을 set해주면 된다. 사실 이 경우는 Swing같은 rich clients에게 적합하다.
+) TODO: 시큐리티 관련 설정 방법을 정리하고 예제 웹페이지 만들어보기
출처
https://sjh836.tistory.com/165
https://offbyone.tistory.com/88
https://hanee24.github.io/2018/04/21/authentication-authorization/
http://blog.naver.com/PostView.nhn?blogId=tmondev&logNo=220310743818
https://docs.spring.io/spring-security/site/docs/current/api/org/springframework/security/web/servletapi/SecurityContextHolderAwareRequestFilter.html
Comments